
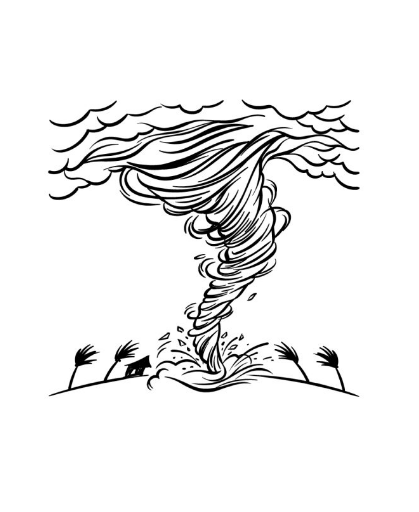
How to Draw A Hurricane. Many different natural phenomena are incredibly dangerous and destructive. They can vary from tornadoes and tsunamis to quakes and surges.
Table of Contents
How to Draw A Hurricane. Many different natural phenomena are incredibly dangerous and destructive. They can vary from tornadoes and tsunamis to quakes and surges.
Also, check out our cute panda coloring pages.
One of the numerous devastating disasters would have to be storms. These are some of the most severe and destructive storms that can strike and pose a major threat whenever they do.
While terrifying, they can also be awe-inspiring, and many people enjoy learning how to draw a hurricane so they can reproduce the intensity they bring.
How to Draw A Hurricane
Step 1
For this first step of our how-to draw a hurricane guide, we’ll start where you don’t want to be when one hits: the base!
First, draw two curved lines with a space between them for the ground where the hurricane will pass.
You can then use some simple shapes to draw some unfortunate trees and houses, and for added effect, you can draw them at an angle to the center of the hurricane.
So we’re going to use a lot of curved stripes to complete the swirling dust at the base of the hurricane, and then you can draw some stripes and tiny pieces of debris.
Step 2
At this stage of drawing the hurricane, we’ll add more to the hurricane.
The first half of the hurricane is quite thin and twisted and is drawn with many curved lines that connect.
At the top of the section we’re going to draw now, you can add some larger curved lines to make the hurricane structure look more irregular.
Step 3
Continuing with this tutorial on drawing a hurricane, you are now ready to draw the next section.
At this point, the hurricane’s body thickens slightly as it rises. As shown in our reference image, it also starts to twist heavily to the left.
By turning it to the left, you can start tilting it toward the sky, but we’ll draw that part later.
Make sure to include some open, curved lines at the top of this section so we can draw more sections in this blank space later in this guide.
Step 4
For this fourth step of this guide to drawing a hurricane, we’ll take the focus away from it and draw the clouds gathering over it.
To draw these clouds, you can use lots of jagged lines to create puffy clouds. It would be best if you used a lot of those little jagged lines to make the cloud cover more intense.
Then you can also draw some extended curved stripes for the area where the hurricane links to the shadow cover.
The next step is adding the final details and elements, so let’s get started!
Step 5
You have now reached the fifth step of this tutorial on how to draw a hurricane. In this step, we will complete the details and final sections to prepare you for the final step of the guide.
To do this, draw the final section of the hurricane. We will draw this section using more of the wavy lines you drew in the clouds in the previous step.
Once you’ve drawn that final hurricane section, you’re ready for the final part!
Before proceeding, you can also add some personal information. These details could include flying debris, or you could add more to the image’s background.
Step 6
For this last part of the hurricane drawing, you can finish it off by adding some colors. In our reference image, you can see just one of the many ways you can colorize this image!
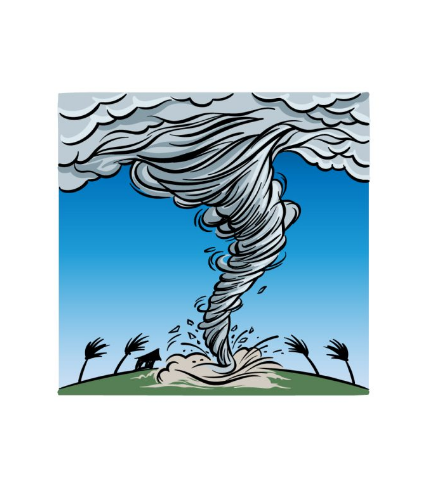
We then finished with some green for the grass to add lighter colors.
You can choose similar colors in your interpretation of this design, but there are many other colors you could choose too!
Your Hurricane Drawing is Finished!


More Stories
Leadership Coaching Training the Secret to Executive Success – A Complete Review
How Do You Choose Between 6-Hour and 12-Hour French Tutoring?
What Is a Youth Opportunity Center? Programs, Benefits, and How They Empower Young People